
Plastic welding is the most effective way to repair cracks, holes, and gouges in a polyethylene kayak hull. Done correctly, a welded repair is strong, watertight, and barely visible once finished.
Most modern kayaks are made from high-density polyethylene (HDPE), which responds well to heat welding. Older kayaks made from cross-linked polyethylene (XLPE) are more difficult to weld as the material does not re-fuse as readily when reheated.
This guide covers the tools you need, how to identify your hull material, and the step-by-step process for welding a crack or hole in a polyethylene kayak.
Tools Required for Kayak Plastic Welding
- Heat gun or plastic welding iron
- HDPE welding rod (same material as the hull)
- Drill with small drill bit
- Pliers
- Sharp knife or razor blade
- Sandpaper (80 grit and 120 grit)
- Mineral spirits or isopropyl alcohol for cleaning
A heat gun provides more control than a welding iron for kayak repairs. Whatever tool you use, consistent low to medium heat produces better results than high heat. Overheating causes the plastic to bubble and burn rather than fuse cleanly. The JOJOrec 2000W Heat Gun is a practical option with adjustable temperature settings suitable for plastic welding.
Identifying your hull material
Most kayaks manufactured after the mid-1990s use HDPE. If you are unsure, check the manufacturer’s specifications or look for a material stamp moulded into the hull. HDPE welds cleanly and fuses readily. XLPE is harder to weld and requires a higher heat and more pressure to achieve a good bond.
How To Weld a Kayak Hull: Step by Step
Step 1: Clean the Repair Area
Wash the crack or damaged area thoroughly with fresh water to remove salt, grit, and oil. Allow to dry completely. Wipe the repair area with mineral spirits or isopropyl alcohol to remove any remaining contaminants. Clean plastic bonds significantly better than dirty plastic.
Step 2: Drill Stop Holes at the Crack Ends
Using a small drill bit, drill a hole at each end of the crack. These stop holes prevent the crack from extending further during the repair process and under future load. This step is particularly important for longer cracks.
Step 3: Prepare the Weld Surface
Using a sharp knife or razor blade, cut a V-shaped groove along the length of the crack. The V-shape increases the surface area available for the weld and allows the welding rod to penetrate deeper into the crack for a stronger bond. Sand the repair area lightly with 80-grit sandpaper to roughen the surface and improve adhesion.
Step 4: Source the Welding Rod
For a minor crack, a small piece of plastic can be cut from an inconspicuous area of the kayak hull such as the inside rim. For larger cracks or holes, purchase a dedicated HDPE welding rod in a colour that matches your hull. For a convenient all-in-one solution, the Foreverup Plastic Welding Kit includes welding rods and reinforcement fabric. Using the same material as the hull is essential for a strong, compatible bond.
Step 5: Preheat the Repair Area
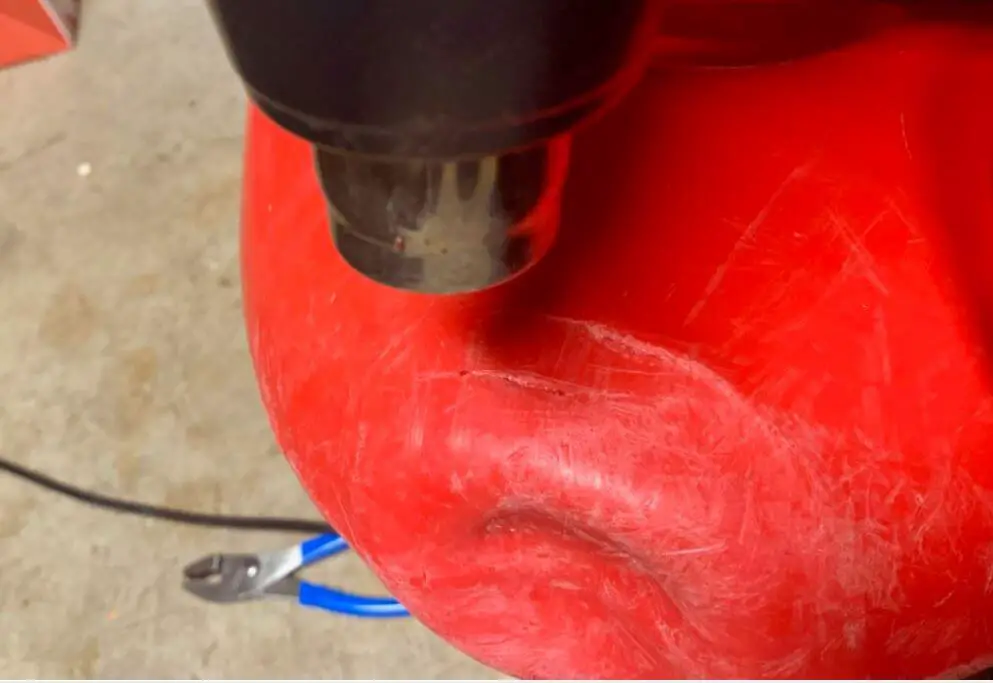
Set the heat gun to a low to medium setting. Hold it approximately 5cm (2 inches) from the repair area and move it slowly back and forth to warm the plastic evenly. The surface should become slightly shiny and soft to the touch but should not bubble or smoke. Adequate preheating ensures the welding rod fuses with the hull rather than simply sitting on top of it.
Work in a well-ventilated area when heating plastic. The fumes produced are unpleasant and should not be inhaled.
Step 6: Apply the Welding Rod
Hold the welding rod with pliers and apply heat to both the rod and the repair area simultaneously. As the rod softens and becomes shiny, press it firmly into the V-groove along the length of the crack.
Work slowly and steadily from one end of the crack to the other. Keep both the rod and the hull surface at the same temperature throughout. The rod should fuse into the groove rather than sitting on top of it. If the rod is not bonding, increase the heat slightly.
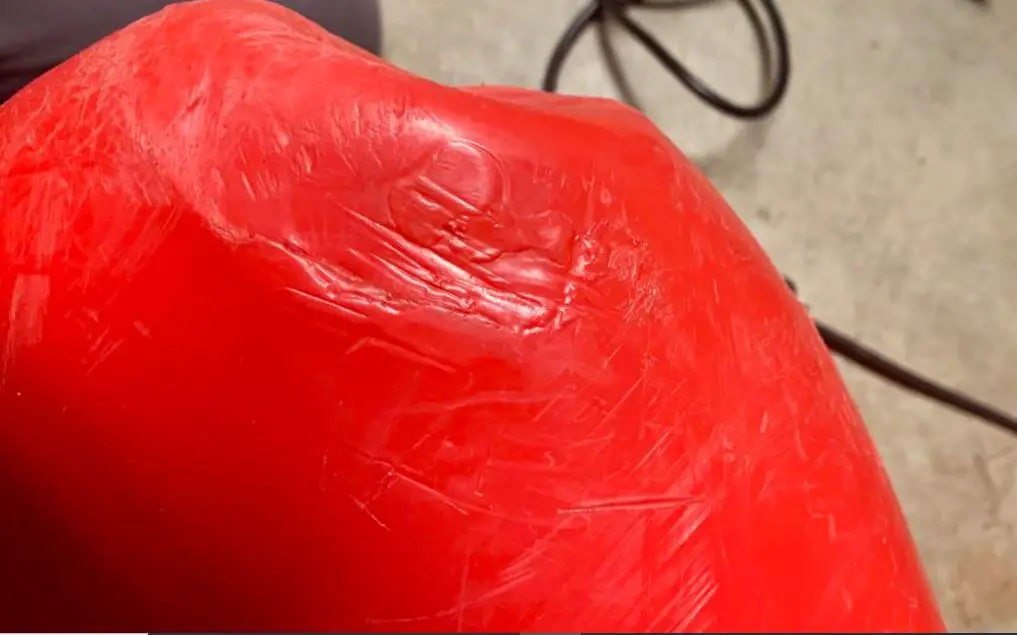
Step 7: Smooth and Finish
While the weld is still warm and slightly soft, use a smooth tool or the back of a knife to press and smooth the repair. This consolidates the weld and removes any air gaps.
Once the weld has cooled completely, sand it smooth with 120-grit sandpaper until it is flush with the surrounding hull surface. The repair should be solid and smooth with no gaps or voids.
Step 8: Test the Repair
Before returning to the water, test the repair by pressing firmly around the weld and checking for any flex or movement. Fill the repaired area with water and check for any seepage. A sound weld is rigid and completely watertight.
Tips for a Better Weld
Practise first — if you have never welded plastic before, practise on a scrap piece of HDPE before working on the kayak. A plastic bucket or cutting board made from polyethylene is a good practice surface.
Use consistent heat — slow, even heat produces stronger welds than quick bursts of high heat. Overheating causes the plastic to char and weakens the repair.
Reinforce large cracks — for cracks longer than 15cm (6 inches), apply a second pass of welding rod over the first to build up the repair and add strength.
Match the material — always use the same type of plastic as the hull for the welding rod. Mixing HDPE with other plastics produces a weak, incompatible bond.
Frequently Asked Questions (FAQs)
Can you plastic weld a kayak?
Yes. Most modern kayaks are made from HDPE which responds well to heat welding. Cracks, holes, and gouges can all be repaired using a heat gun and HDPE welding rod. The quality of the repair depends on the preparation, the heat control, and using the correct matching material.
What type of plastic are most kayaks made from?
Most modern kayaks are made from high-density polyethylene (HDPE). Some older kayaks used cross-linked polyethylene (XLPE), which is harder to weld. Check the manufacturer’s specifications if you are unsure which material your kayak uses.
Can you repair a kayak with a hairdryer?
A hairdryer does not produce enough heat for plastic welding. A dedicated heat gun rated for at least 300°C is required to soften polyethylene to welding temperature. Heat guns are available from most hardware stores for around AUD$40 to AUD$80 (USD$25 to USD$50).
When should you replace rather than repair a kayak?
Minor cracks and small holes are worth repairing. If the hull has multiple large cracks, significant deformation, or structural damage to the bow or stern, replacement may be more practical than repair. A repaired kayak is safe for recreational use but may not be suitable for demanding conditions.
Final Thoughts
Plastic welding is a practical and cost-effective way to extend the life of a polyethylene kayak. The key steps are thorough preparation, consistent low to medium heat, and using the correct matching material. A well-executed weld is strong, watertight, and barely visible once sanded smooth.
For more on kayak maintenance, read our guides on kayak oil canning and how to keep your kayak in good shape.