
Loading a kayak onto a J rack by yourself is one of the more physically demanding parts of kayaking, particularly with heavier hardshell kayaks. With the right technique it is manageable solo, and there are several methods that make the process easier depending on your height, strength, and vehicle type.
This guide covers how to install a J rack correctly and four practical methods for loading a kayak onto it without assistance.
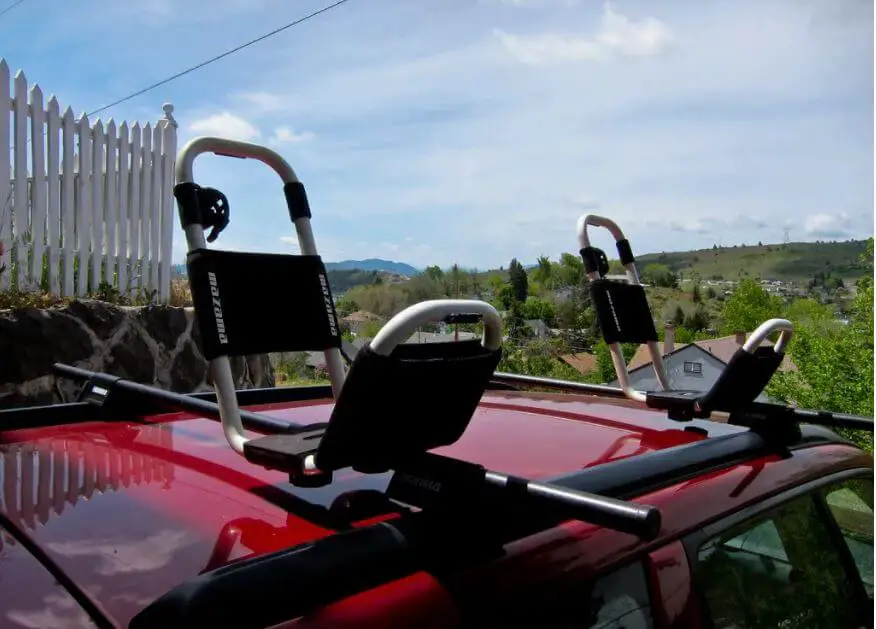
What Is A J Rack?
A J rack is a kayak carrier that mounts to the crossbars on the roof of a vehicle. The name comes from its J-shaped profile. The kayak sits on its side at roughly a 45-degree angle inside the J shape, which reduces wind resistance compared to carrying a kayak flat on the roof.
J racks typically come in pairs and can carry one or two kayaks depending on the width of the vehicle’s roof. They require existing crossbars to be installed as most J racks clamp directly onto standard crossbar profiles.
The angled storage position also leaves more roof space available compared to flat saddle-style carriers, which is useful when carrying two kayaks side by side.
How To Install a J Rack
Check your vehicle
J racks work on most cars, SUVs, and trucks with crossbars. Smaller vehicles with lower roofs are easier to load from the ground. Taller vehicles like SUVs may require a step stool or the door frame step for loading.
Mount to your crossbars
Attach the J rack to your existing crossbars following the manufacturer’s instructions. Most J racks use a clamp mechanism that tightens around the crossbar profile. Make sure both racks are positioned at the same distance from the centre of the roof before tightening.
Orient correctly
Mount the J rack with the open side of the J facing outward toward the side of the vehicle. The taller part of the J should face toward the centre of the roof. This orientation allows you to load the kayak from the side by sliding it up and into the J shape.
How To Load a Kayak on a J Rack Solo
Method 1: Leg Lift
Stand beside the kayak with it on the ground next to you. Squat down and grip the cockpit rim with both hands. Lift using your legs rather than your back, keeping your back straight throughout. Once the kayak is at waist height, rest it on your thigh briefly to reposition your hands, then lift it to shoulder height and slide it onto the J rack from the side.
Always bend at the knees rather than the waist when lifting. Lifting with a straight back and engaged core significantly reduces the risk of back strain.
Method 2: Shoulder Press
Stand beside the kayak and lift one end, resting it against your shoulder. Walk your hands toward the centre of the kayak until it is balanced across your shoulder. With the kayak balanced at shoulder height, walk to the side of the vehicle and slide the kayak up and into the J rack.
This method works well for paddlers who are comfortable carrying weight on their shoulder and have a vehicle with a relatively low roof height.
Method 3: Hood Slide
Place a thick blanket or towel over the rear of your vehicle’s roof to protect the paintwork. Lift the bow of the kayak and rest it on the rear of the roof. Walk to the stern and lift, then slide the entire kayak forward across the roof until it reaches the J racks. Lift the kayak into the J rack position from there.
This method works particularly well for heavier kayaks and taller vehicles where lifting to full roof height in a single movement is difficult. Make sure the protective cloth moves with the kayak as you slide it forward.
Method 4: Two-Stage Lift With a Step
Place a step stool or use the vehicle door frame step to gain extra height. Lift the kayak to roof height in two stages. First lift to waist height, then rest it briefly on the door frame or roof edge before lifting to rack height. This breaks the full lift into two shorter movements, which significantly reduces the effort required.
How To Secure the Kayak on the J Rack
Once the kayak is seated in the J rack, secure it with cam buckle or ratchet tie-down straps before driving. Loop the straps over the kayak hull and through or around the crossbars, then tighten firmly until there is no movement.
Add a bow line from the front of the kayak to the front of the vehicle and a stern line from the rear of the kayak to the rear of the vehicle. These lines prevent the kayak from shifting forward or backward during acceleration and braking.
Check all straps again after the first few kilometres of driving and re-tighten if any have loosened.
Read: How To Strap a Kayak to a Truck Bed Extender
Final Thoughts
Loading a kayak onto a J rack solo is straightforward once you find the method that suits your height, vehicle, and kayak weight. The hood slide method works best for heavier kayaks and taller vehicles. The shoulder press is fastest for lighter kayaks and lower vehicles. Regardless of which method you use, always use your legs rather than your back when lifting.
For more on transporting and storing your kayak, read our guides on how to store a kayak and kayak weight limits.